Developing a custom workflow in EPiServer : Part two
This technical article was first published over 2 years ago and may discuss features and approaches that are no longer relevant for the current version of the platform.
This is the second post, in a series of five about developing a custom workflow in EPiServer.
- Part One – Overview and Requirements
- Part Two – Windows Workflow Foundation in EPiServer
- Part Three – Designing the Workflow
- Part Four – EPiServer tasks and working with the user interface
- Part Five – Access control and finishing touches
Windows Workflow Foundation in EPiServer
Windows workflow is a full runtime that can be hosted by any application running on the Microsoft ASP.NET stack. It defines all of the services that are necessary (persistence, threading and transactions) to manage the steps, rules and decisions that make up any arbitrary workflow task.
EPiServer first implemented Windows Workflow Foundation in CMS 5. The EPiServer application acts as the host for the workflow runtime, telling the workflow runtime the type of workflows to create, and communicating any events to the runtime. The runtime itself manages the workflow lifecycle, including persistence and will notify the host of any important workflow events such as completion or termination.
You can see the configuration for the workflow foundation within the EPiServer web.config file, where the runtime itself is configured and the persistence mechanism is setup, which is either a SQL Server or Oracle database (state is serialised into one of two workflow related tables called InstanceState and CompletedScope).
There are two main types of workflows that can be developed using Windows workflow foundation
- StateMachineWorkflows
- SequentialWorkflows
A SequentialWorkflow is predictable and can only execute in the given order which is defined within the workflow code itself. In this sense you can describe the workflow itself as being in control of its execution pathway. A StateMachineWorkflow relies on external events to drive it to completion and the external decisions define which state the workflow transitions to, meaning that it is the external events that are in control.
Our requirements can be satisifed by a StateMachineWorkflow as the external decisions that are made by Approvers or Publishers define the workflow completion order.
You can select a new StateMachineWorkflow directly from the Visual Studio ‘Add item’ command, you’ll see that it simply inherits from StateMachineWorkflowActivity:
public sealed partial class TwoStagePageWorkflow : StateMachineWorkflowActivity
{
   //implementation
}
Communication
The most important element to define is the code that specifies how your host application communicates with the workflow runtime.
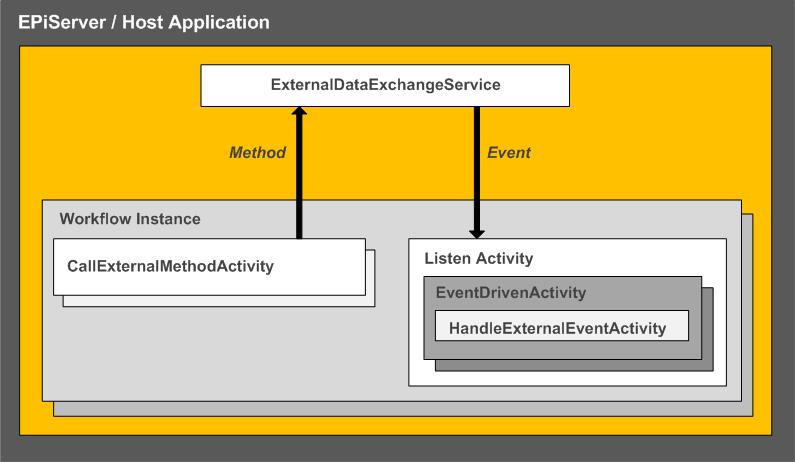
The workflow can either handle external events or invoke external methods. This is defined by the contents of a Service interface that is marked with the [ExternalDataExchange()] attribute.
using System;
using System.Workflow.Activities;

namespace TwoStage.Workflow.Communication
{
	[ExternalDataExchange()]
	public interface ITwoStageService
	{
		event EventHandler<TwoStageEventArgs> PageApproved;
                event EventHandler<TwoStageEventArgs> PageDeclined;
                event EventHandler<TwoStageEventArgs> PagePassedToApprover;
                event EventHandler<TwoStageEventArgs> PagePassedToPublisher;
	}
}
For our two-stage workflow, we need to handle the following external events, which correspond to decisions that a Creator, Approver or Publisher will make within the EPiServer Ui, which will then be raised by a concrete implementation of the above ITwoStageService interface. These events map to our StateMachine moving between the following four states.
- WithApprover
- WithPublisher
- PageDeclined
- PageApproved
Also you must define the event arguments that are passed when any of the external events are raised and then handled.
using System;
using System.Workflow.Activities;
using EPiServer.Core;
using TwoStage.Workflow.Domain.TaskOwner;

namespace TwoStage.Workflow.Communication
{
[Serializable]
public class TwoStageEventArgs : ExternalDataEventArgs
{
   public TwoStageEventArgs(Guid instanceId, PageReference pageLink, TaskOwner assignedTo, TaskOwner wasAssignedTo, string message) : base(instanceId)
   {
      PageLink = pageLink;
      IsAssignedTo = assignedTo;
      WasAssignedTo = wasAssignedTo;
      Message = message.Replace(Environment.NewLine, "<br />");
   }

   public PageReference PageLink { get; internal set; }

   public TaskOwner IsAssignedTo { get; internal set; }
   public TaskOwner WasAssignedTo { get; internal set; }

   public string Message { get; internal set; }
   }
}
Our custom EventArgs will hold the following properties, a PageReference so we know which EPiServer page the workflow task has been created against. A custom type allowing us to know who the current actioning user or role is, and also the same type to define who previously was responsible. It also defines a string based message.
Any custom EventArgs must inbherit from ExternalDataEventArgs and must be marked as serializable (as must all types defined within the EventArgs class).
If you look at the default EPiServer web.config file / EPiServer.config, you will see that there are three communication services defined for the out-of-the-box workflows. Any new service should also be registered here.
<externalServices>
   <!-- externalService:      Custom services that is to be registered with workflow runtime-->
   <externalService type= "EPiServer.WorkflowFoundation.Workflows.ApprovalService,EPiServer.WorkflowFoundation" />
   <externalService type= "EPiServer.WorkflowFoundation.Workflows.ReadyForTranslationService,EPiServer.WorkflowFoundation" />
   <externalService type= "EPiServer.WorkflowFoundation.Workflows.RequestForFeedbackService,EPiServer.WorkflowFoundation" />
</externalServices>
Now we’ve defined the communication pathway between the workflow runtime and the EPiServer host application, we can design the workflow itself and create the activities that the workflow must perform.
See you for part 3